Friday, December 27, 2013

A Little Princess

It's Friday and time for a new challenge at Digitally Sweet Challenges.

Theme
Anything Goes

Sponsor

,

Our sweet great granddaughter, the cutest little princess ever!  At least we think so.  I used Emily Snow Princess from Lacy Sunshine, the scrapbook kit was a freebie called Lil Princess Mini Kit.

The image was colored with Prismacolor pencils.  I then took a pic of it and brought it back into Photoshop Elements to create my LO.

So that's it for me today.  I'm still trying to get caught up with everything that I've let slide the last two weeks.  One more family gathering on Sunday and then I'll be able to get back to my regular routine.  

Thanks so much for visiting and wishing you a blessed day!

Thursday, December 26, 2013

ATC Paper Bag Mini

It's time for some more Heartfelt Creations inspiration and this week I created an ATC paper bag mini album.  Here is the front and back cover.  I've used a magnet under the ribbon for a closure.


I have included all the products and instructions for how this was constructed.

Heartfelt Creations Products
HCPC 3571 Keys and Roses PreCut Set
HCPC 3572 Floral Keys and Locket PreCut Set
HCPC 3573 Burnished Key Hole PreCut Set
HCPC 3569 Burnished Key PreCut Set
HCPC 3502 Mini Vintage Floret PreCut Set
HCD 741 Burnished Key Die
HCD 727 Vintage Floret Die
HCDP1 238 Floral Key Paper Collection
159223 Paper Blossoms Molding Mat
459222 Paper Blossoms Tool Kit

Other Products: white card stock; Distress Inks, Victorian Velvet, Walnut Stain; Prismacolor pencils; Stampendous Shabby Pink Embossing Enamel; paper bags; lace; ribbon; pearls; stamens; oval Nestabling; pop dots; Glossy Accents; magnet; Stickles, Star Dust; Krylon Gold Leafing Pen; sewing machine

Instructions:  you can find a video tutorial to make the paper bag album here: http://www.youtube.com/watch?v=BkfFUlJNNrg  I used design paper to construct the cover. I also added some ribbon around the spine before I attached the pages. The images for the front and back were stamped on a photo mat from the design paper. Add embossing enamel and Stickles. Before attaching the front panel, add a magnet under the circle of the stamped design. Stamp and cut out another circle and add the other half of the magnet under this piece. Attach this to the top of the ribbon. Stamp and die cut the key, edge with the gold pen, add Nestabling. Attach the key to top of circle. Add lace and pearls. Stamp and die cut flowers and leaves, shape and add pearl. Add to front with stamens. The ATC cards are all cut 2 1/2" x 3 1/2". I used design paper to create a border around them that are cut 2 5/8" x 3 5/8". They are all colored with pencils and embellished with embossing enamel and Stickles.

Thanks so much for visiting and have a blessed day!

Friday, December 20, 2013

Together At Christmas

It's another beautiful Friday and we all know that means another new challenge at Digitally Sweet Challenges

Theme
Photo Inspiration

Sponsor

I used Trish's new kit called Snow Fun which comes in a pretty blue and white color scheme.  To make it match our inspiration's colors, I used some blending modes in Photoshop Elements.  This photo was one we used for our Christmas cards several years ago.  

I know we are down to the last 5 days before Christmas; will you have a few moments to play with us?  I hope you do, we love to have you join us!

Thanks for visiting and have a blessed day!

Wednesday, December 18, 2013

Your Destiny Is In The Journey

Happy Wednesday, everyone!  It's a beautiful snowy morning and I'm a little more relaxed since my daughter, DGD and I finished my Christmas shopping yesterday. Yay!  

So today it's time for some more Heartfelt Creations inspiration.  


Today I'm using the Journey of Love Keys and Floral Keys and Locket Sets.  Using the card panel from the Floral Keys Paper Collection makes everything so quick and easy, a must for this busy time of  year.   Below you will find the complete list of products and instructions of how this card was created.

Heartfelt Creations Products
HCPC 3574 Journey of Love Keys PreCut Set
HCPC 3572 Floral Keys and Locket PreCut Set
HCPC 3569 Burnished Key PreCut Set
HCPC 3303 Posy Patch Flowers
HCD 701 Posy Patch Die
HCD 741 Burnished Key Die
354802 Classic Ovals Large
HCDP1 238 Floral Key Paper Collection
459222 Paper Blossoms Tool Kit
159223 Paper Blossoms Molding Mat
273900 Zip Dry Paper Glue

Other Products: black, white and lt. blue card stock; Ranger Archival Ink, Jet Black; Tea Dye Distress Ink; Prismacolor pencils, Stickles, Star Dust; Clear Star Gelly Roll Pen; Krylon Silver Leafing Pen; pearls; ribbon; pop dots

Instructions: Cut black card stock 7" x 10", fold in half to make 5" x 7" card. Trim card front from design paper to 4 3/4" x 6 3/4", add ribbon and then add to card with pop dots. Stamp, die cut, and color the images. Edge with silver leafing pen and add stickles, add to card with pop dots. Stamp and die cut key and locket, edge with silver and add to card with pop dots. Stamp and die cut flower, shape and add stickles. Add to card with a pop dot. Add pearls.

I hope you will take a few moments from your busy day to visit the Heartfelt Creations blog and see all the awesome projects from the very creative design team!

Thanks for visiting and have a blessed day!

Friday, December 13, 2013

Inspired by Frosty

A fun new challenge is ready and waiting for you at Digitally Sweet Challenges.

Theme
Inspired by Frosty

Sponsor

Several years ago I started collecting snowmen so I was thrilled to have Frosty as our theme this week.  Isn't this the cutest image!?  You can find more adorable images by visiting Lunagirl.   Since I seem to be in a time crunch, I chose to use a quick page, meaning that all the elements had already been added to the page.  All I had to do was add the image.  Wonderful time saver for such a time as this, LOL!

I do hope you will hop on over to Digitally Sweet and join us.  We love to see all your lovely creations! 
Thanks for visiting and have a blessed day!

Thursday, December 12, 2013

A Place Called Home

Hi everyone!  It's Wednesday and time for some new inspiration at Heartfelt Creations.  Oh wait!  That was yesterday, wasn't it?  I think the holiday season has finally done me in!  But cheeze, you'd think I could remember to do a post! 

Today I am sharing a card design that I learned from my sweet friend, Tracy.  You can find her video tutorial here.  This large background stamp worked beautifully for this design.  Here is the inside.


And here are all the details of how I created this card.

HCPC 3573 Burnished Key Hole PreCut Set
HCPC 3576 A Prayer For The Day PreCut Set
HCPC 3570 Floral Doorway and Latch PreCut Set
HCPC 3551 Holly Berry PreCut Set
HCPC 3303 Posy Patch Flowers PreCut Set
HCDP1 238 Floral Keys Paper Collection
HCD 738 Ornamental Add On Die
HCD 701 Posy Patch Die
Spellbinders Labels 18
Spellbinders Labels 8

Other Products used: white card stock; VersaFine, Smokey Grey; Ranger Walnut Stain Distress Ink; Stampendous Shabby White Embossing Enamel; pop dots, Aleene's Tacky Glue; Scor-Tape; Fabric Fusion; Krylon Gold Leafing Pen; circle cutter; pearls; lace; pom pom trim; Stickles, Star Dust

Instructions: Create the basic card following the video and then  for the wings of the larger piece, cut 2 pieces of design paper 1 1/4" x 5 7/8". Add to card; add lace. For smaller wings, cut 2 pieces of design paper 7/8" x 5 7/8", add to card. Add ribbon. Top inside panel, cut design paper 3 3/4" x 5 3/4", add to card. Stamp image, die cut and ink edges. Add embossing enamel and then add to card with pop dots. Bottom inside panel; cut design paper 3 3/4" x 5 3/4", cut out card panel and add to design paper. Add to card. Stamp sentiment, die cut, ink the edges and add embossing enamel. Add to card with pop dots. Add pearls. Outside panel, stamp door, add embossing enamel and add to card front. Edge with gold pen. Stamp sentiment, cut out with circle cutter, ink edges and add lace. Stamp and die cut leaf swirl and flowers. Cut leaves apart and add to circle. Add pearls and pom pom trim. Add Stickles.

Thanks so much for visiting and have a blessed day!

Friday, December 6, 2013

Christmas Bells

It's time for a new challenge at Digitally Sweet Challenges.


Theme
Inspired by a Vintage Christmas

Sponsored by

I'm not sure how vintage this is but I love this picture of my grandchildren, taken several years ago at Christmas.  What you can't see is the television screen.  They were having lots of fun playing along.  The Christmas Bells at the top corner are from Digi Darla which I colored in Photoshop Elements. 

So now it's your turn to show us your vintage creations.  I'm sure you can come up with something a little more vintage than I have!

Thanks for visiting and have a blessed day!

Friday, November 29, 2013

Key To My Heart


It's time for a new release at Heartfelt Creations and today we are pleased to present the Floral Key Collection. This collection contains a neutral color palette with card panels, papers, stamps and dies that will enable you to create quick cards while achieving the "wow" factor. The Floral Key Collection is a set of key and lock stamps and dies with a paper pack that contains a variety of card fronts, 6" x 6" pieces and 12" x 12" layouts with borders and frames. It's a creative, fun exploration of the vintage spirit. The Floral Key Collection will unlock your imagination to creating incredibly beautiful, "fine art" cards. Take advantage of extra savings when shopping with Heartfelt Creations on Black Friday.

Leave a comment on the Heartfelt Creations blog by December 3rd to be eligible to win the entire Floral Key Collection valued at $200. The winner will be announced on December 4th on the Heartfelt Creations blog.

Fifty years ago, on a snowy Thanksgiving Day, my husband and I were married.  This stamp set was perfect to make a little something special for my husband.

Below you will find the product list and instructions on how I made this card.

Heartfelt Creations Products

HCPC 3574 Journey of Love Keys PreCut Set
HCPC 3569 Burnished Key PreCut Set
HCPC 3468 Tattered Blossoms PreCut Set
HCPC 3551 Holly Berry PreCut Set
HCD 741 Burnished Key Die
HCD 722 Tattered Blossoms Die
HCD 738 Ornamental Add On Die
HCDP1 238 Floral Keys Paper Collection
HCDP1 225 Frosty Blanket Paper Collection

Other Products: Cream card stock; Distress Ink, Walnut Stain; Krylon Gold Leaf pen; pearls; lace; ribbon; stamens; pop dots; Glossy Accents; pink heart rhinestones, Prismacolor pencils; Snow-Tex; glitter

Instructions: Cut dark red DP 6" x 12", fold in half. Cut 5 7/8" square from ivory Frosty Blanket paper.  Cut 5 3/4" square from Floral Keys paper. Layer on card front. Add lace. Stamp sentiment on journal panel. Add to card with pop dots. Stamp heart, color and cut out. Add lace to back and add to card with pop dots. Stamp key and locket, color, die cut and edge with gold pen. Tie ribbon around key and add to heart. Add heart and locket to card. Stamp, color and die cut flowers and leaf swirls. Create flowers, add Snow-Tex, glitter and pearls. Add to card with stamens.

I also made a little domino book with our wedding picture.  

I'm not quite sure why we didn't smile; maybe too nervous!  This was taken before the ceremony.  We have very few pictures which I really regret.


Heartfelt Products

HCPC 3575 Script Key Background PreCut Set
HCPC 3569 Burnished Key PreCut Set
HCPC 3572 Floral Keys and Locket PreCut Set (Sweet Memories)
HCPC 3303 Posy Patch Flowers PreCut Set
HCD 741 Burnished Key Die
HCD 701 Posy Patch Die
HCDP1 238 Floral Keys Paper Collection

Other Products: white, black, dark red card stock; 2 dominos; Versifine, Smokey Grey; Delicata Golden Glitz; Ranger Embossing Ink, SuperFine Detail Gold embossing powder, Walnut Stain Distress Ink; Folk Art Metallic Champagne acrylic paint; Black Magic Glimmer Mist; lace; ribbon; Recollections rhinestones; Krylon Gold Leaf Pen; Star Dust Stickles; Gesso; Glossy Accents; Fabric Fusion

Instructions: Paint dominos with acrylic paint, when dry add lace around edge. Glue 12" piece of ribbon, centered, on back of domino. Cut white card stock 2" x 12". Ink script stamp with grey, stamp off on scrap paper, then stamp on strip. Ink Sweet Memories stamp with gold and stamp over grey. Score paper every 1" and fold accordion style. Ink edges and folds with Golden Glitz. Cut tickets from design paper and add. Print pictures and add. Spritz heart lace with Glimmer Mist and add to top. Stamp 1 set of keys in Walnut Stain; stamp 1 set on black and emboss in gold. Die cut; ink the edges of white set with gold pen. Add as shown. Stamp flowers on dark red card stock, emboss in gold and die cut. Add rhinestones. Make bows and add everything as shown. Glue the dominos to the first and last 1" sections. Add ticket to back domino; add locket, key and flower to front. 


Thanks so much for visiting and wishing you an awesome, blessed day!

Joyful Thanks

It's time for another new challenge at Digitally Sweet Challenges.


Theme
Photo Inspiration

Sponsor
LunaGirl

This lovely bird image compliments this fall picture from our backyard.  I used the photo as the background and reduced the opacity.  

I hope you will find the time to join us again; we love to see your creative projects!

Thanks for visiting and have a blessed day!

Friday, November 22, 2013

A Blue Christmas

It's time for another new challenge at Digitally Sweet.

Theme
Anything Goes

Sponsor

This lovely lady is 'Victorian Winter Emily'.  She is so elegant, I had to give her lots of bling and lace.  I colored her with my Prismacolor Pencils, snapped a picture, and then brought her back into my computer to complete the card.  

I know the theme is one of everyone's favorites so please join us; we love to see all your creativity!

Thanks for visiting and have a blessed day!

Wednesday, November 20, 2013

Peace

Today you will find lots of awesome new inspiration at the Heartfelt Creations blog.  I chose to work with this beautiful image from the Peaceful Night Stamp set which I colored with Prismacolor Pencils. 


This is the first time I've tried the Stampendous Embossing Enamel and I love it!  It's such a beautiful way to add the look of snow. Tip: be careful not to start a fire, LOL!  If you've never used it before, it needs to be heated from underneath and all at once I noticed my paper was smoking!  Yikes!

I'll add my list of products used and instructions.

Heartfelt Creations Products
HCPC 3415 Petite Poinsettia PreCut Set
HCPC 3303 Posy Patch Flowers PreCut Set
HCPC 3551 Holly Berry PreCut Set
HCPC 3553 Peaceful Night PreCut Set
HCD 738 Ornamental Add On Die
HCD 701 Posy Patch Die
HCDP1 225 Frosty Blanket Paper Collection
SKU 253840 Marvelous Squares
741 Shell White Art Glitter
159223 Paper Blossoms Molding Mat
459222 Paper Blossoms Tool Kit

Other items used: White card stock; Ranger Distress Ink, Victorian Velvet, Embossing Ink, Black Soot; Ranger SuperFine Detail Gold Embossing Powder; Deco Art Snow-Tex; Gold Stickles; Stampendous Shabby White Embossing Enamel; lace; seam binding; pearls; Prismacolor Pencils; MS Cherish punch; stamens; pop dots; Glossy Accents

instructions
Cut white card stock 5 1/4" x 12", fold in half. Cut red DP 5" x 6" and punch bottom edge. Add to card front. Cut red DP 4 3/4" square and die cut center. Cut white card stock 5 3/4" x 4 3/4", cut out center, leaving 1/4" border on top and sides. Punch bottom edge. Adhere over square and then add to card with pop dots. Die cut white card stock with largest die. Add to card. Stamp image, color and die cut. Add Stickles and embossing enamel. Add to card with pop dots. Stamp, emboss and die cut flowers and leaves. Create flowers and then add Snow-Tex and glitter. Assemble on card as shown.

Thanks so much for visiting and have a blessed day!

challenges
Creative Craft Challenges: 1 image, 2 papers (red and green for leaves), 3 flowers
Flourishes Timeless Tuesday: winter scenes (created a wintry scene with snow)
Loves Rubber Stamps:  #79 shabby chic or vintage
Created with Love Challenge:  anything papercraft goes
613 Avenue Create:  anything goes w/optional twist, include word Peace or peace symbol

Friday, November 15, 2013

Gratitude

We have a new challenge for you at Digitally Sweet Challenges.

Theme
lace/ribbons

Sponsor

I used the 'Nuts For You' kit from Template Dreams and since it's time for Thanksgiving, thought a little gratitude quote would be timely.  I love the soft colors of this kit.

I hope you will join us with your lace/ribbon projects.  
Thanks for visiting and have a blessed day!

Wednesday, November 13, 2013

Christmas Stocking for a Little Sweetheart

Today's project was such a joy to create!  It's a stocking for my sweet GGD.  It's a Kaisercraft MDF stocking which I finished with lots of pink, lace, and gold, using the beautiful stamps and dies from Heartfelt Creations.

Isn't Lyric a pretty name?  And her sister is Harmonee.  Could it be we have a musical theme going on, LOL.
The letter stickers fit right in the center of the Christmas Sentiment Circles.


The poinsettia flowers are so pretty and easy to make and the Holly Berry stamp and matching die is the perfect size for any project. 

I am including the complete supply list and instructions.

Christmas Stocking

Heartfelt Creations Products

HCPC 3562 Holiday Script Background PreCut Set
HCPC 3553 Peaceful Night PreCut Set
HCPC 3551 Holly Berry PreCut Set
HCPC 3415 Petite Poinsettia Pre Cut Set
HCPC 3561 Christmas Sentiment Circles PreCut Set
HCDP1 234 Daphne Paper Collection
HCD 738 Ornamental Add On Die
354802 Classic Ovals lg Die
209503 Floral Ovals Die
S5-055 Layered Poinsettia Die
159223 Paper Blossoms Molding Mat
459222 Paper Blossoms Tool Kit

Other items used: Kaisercraft Stocking Garland; White card stock; Liquitex gesso and Matte Gel; Ranger Distress Ink, Victorian Velvet, Embossing Ink, Super Fine Detail Gold Embossing Powder; Delicata Golden Glitz; 1" circle punch; letter stickers; Fabric Fusion; Glossy Accents; pop dots; Stickles, Diamond and Gold; pearls; lace; ribbon; feather

Instructions: Paint the stocking with gesso. Glue design paper to front of stocking with Matte Gel and then sand and ink the edges. Stamp images on stocking with Gold. Stamp flowers and circles on white card stock. Die cut flowers, shape and edge with Stickles. Use 1" circle punch to punch out centers of sentiments. Add letter stickers and add Stickles. Stamp leaves on DP, emboss in Gold. Assemble as shown, using pop dots, Fabric Fusion, and Glossy Accents. Add pearls.

Thanks so much for visiting and have a blessed day!

challenges
Artistic Inspirations:  use a sentiment/anything goes
Card Mania:  anything goes
Creative Creations:  sparkle and shine
Make My Monday:  Christmas + anything but a card
Amusing Challenges:  glitter


Friday, November 8, 2013

Dreaming of Christmas

It's Friday and time for another new challenge at Digitally Sweet Challenges.

Theme
Sketch


Sponsored by


We have a brand new sponsor!  We had so much fun working with her images which are from Lunagirl Images CDs -- Ladies Photos Vol 1, Victorian Little Girls, Bouguereau, Babies & Toddlers.  You can also visit her blog LunagirlMoonbeams.com for news, freebies, blog challenges & other fun stuff!

I chose to work with this adorable image; she reminded me of my best friend when we were that age.  I hope you will join us; we always love to see your creative interpretations of the challenge.

Thanks for visiting and have a blessed day!

Wednesday, November 6, 2013

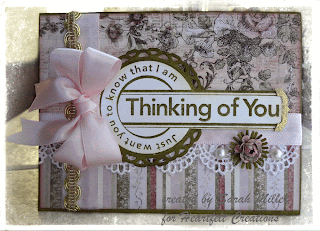
Thinking of You

Today is my first post as a Heartfelt Creations Design Team member.  I am so thrilled to have the opportunity to work with such an awesome group of ladies and these amazing products!  Today my card is made using the Sweet Juliet Collection released in October.

I have included all the details for this card below.
Thanks for visiting and have a blessed day!


Thinking of You
HCPC 3566 Beautiful Juliet PreCut Set
HCPC 3303 Posy Patch Flowers PreCut Set
HCD 733 Decorative Lattice Swirl (anchor)
HCD 726 Delicate Asters Die (smallest)
HCD 701 Posy Patch Die
HCDP1 234 Daphne Paper Collection
S4-354 Spellbinders Splendid Circles
159223 Paper Blossoms Molding Mat
459222 Paper Blossoms Tool Kit

Project Instructions:
Other products: cream card stock; Distress Inks: Forest Moss, Victorian Velvet, Antique Linen, Embossing Ink; gold embossing powder; ATG; foam tape; ribbon; lace; pearls; Glossy Accents
Instructions: create base card 4 1/4"x 5 1/2", ink edges with Forest Moss. Cut pink DP 4 1/8"x 5 3/8", cut striped DP 1 3/4"x 5 3/8", adhere both layers together. Add lace and ribbon. Add to base card with foam tape. Stamp sentiment, cut out, ink edges with Antique Linen. Die cut Splendid Circle, ink with Forest Moss, adhere behind sentiment. Die cut anchor, emboss in gold and add to sentiment. Add to card with foam tape. Stamp and die cut 4 of the smallest flowers and 3 of the smallest from the Asters die, create flower and add to card. Add pearls and bow.

challenges
Creative Craft Challenges:  #22 it's only words
Card Mania Challenges:  #33 anything goes
The Paper Nest Dolls Challenge:  #16 anything goes
Through the Purple Haze:  anything goes
Word Art Wednesday:  #105 anything goes

Friday, November 1, 2013

A Masculine Birthday Card

It's time for another new challenge at Digitally Sweet Challenges and Sue has chosen a very timely theme.


Theme
Trees/Leaves

Sponsored by


When I saw this image, I knew it would be perfect for my husband.  The image has been colored digitally in Photoshop Elements 5.  I used the 'Hey There' kit from Template Dreams.  I'll print out the papers and image and put together a paper version.

I hope you'll join us; we love to visit and see all your gorgeous projects!

Thanks for visiting and have a blessed day!

Wednesday, October 30, 2013

Heartfelt Creations Tag

Today is a very special day!  I get to announce that I have been accepted to be part of the Heartfelt Creations Design Team!  To say that I am excited is quite an understatement!  I love their gorgeous designs and am looking forward to what this new term will hold for each of us.  Thank you so much for all of your votes!

Today I'll share a tag.

Most of these images are new except for the bird, fence and butterfly.  The post card image lends itself to so many different styles but I especially love it for the shabby chic look.  The floral is so beautiful with the sentiment added to the stem.  The Decorative Lattice Die is amazing!  It's my new favorite die!  I'm adding the product list and instructions in case you'd like to create one of your own.

 Tag
HCPC 3563 Post Card PreCut Set
HCPC 3568 Moments With You PreCut Set
HCPC 3566 Beautiful Juliet PreCut Set
HCPC 3486 Organic Fillers PreCut Set
HCPC 3480 Brookside Manor PreCut Set (birds and butterfly)
HCD 733 Decorative Lattice Swirl Die
HCD 723 Garden Romance Die (fence)
SKU: 354811 Spellbinders Classic Scalloped Circle Small
HCDP1 234 Daphne Paper Collection

Project Instructions:
Other products: white card stock; Distress Ink: Forest Moss, Spun Sugar, Vintage Photo, Victorian Velvet, Antique Linen, Embossing Ink; Spellbinders Labels Eighteen; gold embossing powder; ribbon; lace; rhinestones; Viva Pearl Pen; burlap thread; Stickles: Cotton Candy; ATG; Glossy Accents; foam tape; seam binding; eyelet; Prismacolor Pencils
Instructions: cut tag 5 1/2"x 8 1/2"; ink edges with Antique Linen. Cut white card stock 5 1/4"x 8 1/4", ink edges with Spun Sugar. Emboss edge randomly with gold. Add to tag. Cut DP 5 1/8"x 8 1/8", add to tag. Punch hole in top center and add eyelet. Die cut swirl, ink and add to tag. Stamp Post Card twice, once with embossing ink, embossed in gold and edges inked with Spun Sugar. Stamp other one with Antique Linen, ink edges with Forest Moss, Spun Sugar, and Antique Linen. Color flower with pencils. Adhere the 2 cards together, tie with seam binding and add to tag. Add lace to tag. Stamp Beautiful Juliet image, die cut and sponge with same inks. Color with pencils. Add to tag with foam tape. Stamp 'Moments With You' and emboss in gold. Cut out and ink edges. Die cut Scalloped Circle, ink with Forest Moss, adhere to back of sentiment. Add to tag and add rhinestones. Stamp and die cut birds, butterfly and leaves. Die cut fence. Add to tag as shown. Add ribbon and burlap thread at top. Add liquid pearls. Add Stickles to birds and butterfly.

Thank you so much for visiting and have a blessed day!

challenges
Die Cuttin' Divas:  #139 anything goes
Party Time Tuesdays:  #144 anything goes
Created with Love:  anything goes
Simon Says Stamp Monday Challenge:  anything goes
Crafty Hands Challenge:  #1 anything goes

Tuesday, October 29, 2013

Starbucks Christmas Gift

Welcome to the October Heartfelt Creations Alumni Blog Hop!

Hi everyone, it is the last Tuesday of the month so today is the beginning of the Heartfelt Creations Alumni Design Team’s monthly Blog Hop.

I know quite a few people who would love a little bit of Starbucks cheer for Christmas!  These little packets are made for a 16 oz. bottle so I made a pocket tag to hang on the bottle.  I used one of the journal cards from the Frosty Blanket Paper Collection.  I stamped the sentiment from the Yuletide Sentiments PreCut Set.  The poinsettia is from the Petite Poinsettia PreCut Set which I stamped and then die cut with the Layered Poinsettia Shapeabilities die.  I then cut 3 flowers from the DP and added them with pop dots. 

I used the Layered Scalloped Posy Die to create the rounded top of the tag and then used a circle punch for the hole that slips over the bottle.

I also added a piece of DP around the center of the bottle.  I hope you've found a little bit of inspiration for your Christmas gifts, and now you'll hop on to the lovely Nataliya Simpson to see the beautiful project she has created for you.

One of our blogs will be randomly chosen and from all those that commented on that blog, the winner will be chosen.  The blog hop will remain open for comments on everybody’s blog through midnight Friday night November 1st.   The winner will receive a $25 gift certificate. 

Here is the complete blog hop list
Selma Stevenson
Vicki Dutcher 
Candy Slabaugh 
Alissa Wells 
Cibele Glazer 
Emilia van den Heuvel 
Linda Payne 
Sarah Miller (that's me)
Nataliya Simpson
Lisa Allen 

Thanks so much for visiting and have a blessed day!


Friday, October 25, 2013

Sweet, Candy Christmas

It's time for another new challenge at Digitally Sweet Challenges and this week the theme is everyone's favorite!

Theme
Anything Goes

Sponsor

Meet Gemma and her Frosted Gumdrop Tree.  Isn't she the cutest!?  She's been colored with Prismacolor pencils and then I added lots of Stickles.  A little bit of lace, a bow, flowers, and some bling, and she's all ready for Christmas.

We hope you'll join us; we love to visit and see all your creative projects.
Thanks for visiting and have a blessed day!

challenges
4 Krafty Girlz:  anything goes
Aud Sentiments Challenge :  Christmas sentiments
Crimbo Crackers:  #53 Pinktober
Paper Crafting Journey :  anything goes
Creative Moments:  Lace/anything goes
Creative Craft Challenges:  anything goes

Friday, October 18, 2013

2 Cute 2 Spook

It's time for a new challenge at Digitally Sweet Challenges and this week our theme is


theme
Halloween/Scary

sponsor
Template Dreams


This week I created a double LO using some of my favorite pictures.  We took our DGD's to a community Halloween event.  I made matching cow outfits; they looked so cute! 


These girls absolutely adored each other!  It's hard to believe they are all grown up now.

Oh, so sweet!  No scary Halloween for us; just lots of cuteness!

I used 2 kits from Templete Dreams: 2 Cute 2 Spook and Candy Hearts.
 
Be sure to stop by Digitally Sweet to see all the wonderful inspiration from the rest of the DT; we'd love to have you play along with us this week.
Thanks so much for visiting!  Have a blessed day!

challenge
Crafting For All Seasons:  too cute to spook

Wednesday, October 16, 2013

Heavenly Music

Today I'm using this sweet little angel from DigiDarla.  


 She's been colored with chalk and then I added some Stickles to give her some sparkly, heavenly dust.  She's also been paper pieced.  I also use 1/16" foam tape which lets me use it on several layers without the card becoming too thick.  I used some metallic gold thread to stitch the edges.  The tag is one of my favorite Marianne dies.  The background was embossed with Spellbinders M-Bossabilities EL-005. 

The sentiment was printed from the computer.  Font: 'Before the Rain', and I finally managed to stay with a sketch, LOL.


Thanks for visiting and have a blessed day!
challenges I would like to enter

Mojo Monday sketch
Creative Craft Challenges:  anything goes
Holly Jolly Christmas Challenge:  inspired by a Christmas Carol
Twist of Faith Card Challenge:  things with wings/inspirational sentiment
Card Mania:  pastel colors
Craft Your Passion:  embossing
Created with Love Challenges:  sewing
Cutie Pie Challenge:  cute + tag
The Paper Girls:  sew it on
There She Goes 229:  be prepared/Christmas

Friday, October 11, 2013

Owl Love You Forever

Today it's time for another new challenge at Digitally Sweet Challenges and our theme this week is

Theme:
favorite color

Sponsor
    BigHeadsStamps            
This week we have a new sponsor, BigHeads Stamps.  These images are the artwork of Bruna Mayers from Germany.  When you join the challenge you will have the chance to win 4 of her lovely images.  I chose to work with Isabelle.  Such a lovely young lady. 

I started with a sketch but by the time I was finished, the sketch was no longer recognizable!  The image was colored with Prismacolor pencils.  I tried a tiny bit of 'out of bounds' die cutting.  It's such an old technique but I'm just getting around to trying it.

I hope you'll join us with your favorite colors!  And don't forget to use something digital on your creation!

Thanks for visiting and have a blessed day!

challenges
My Heart Pieces Digital Stamps:  anything goes
Sisterhood of Crafters:  anything goes
Creative Craft Challenges:  anything goes 
Papertake Weekly:  use 2 of something
Artistic Inspiration:  anything goes/girly
Robyn's Fetish:  use a digi
ABC Challenges:  W is for words

Friday, October 4, 2013

Let Heaven and Nature Sing

A new challenge is starting at Digitally Sweet Challenges.

Theme
anything with wings

Sponsor


Does it seem as if I've skipped all the fall holidays and jumped right into Christmas?  I'm getting ready for a huge Christmas project which is why I'm immersed in all things Christmas!  This sweet angel is DigiDarla's Girl Angel Flute.  I digitally paper pieced and colored her. She'll be perfect for paper piecing when I print her.
We're looking forward to seeing your creations with wings.  Please be sure to use at least one digital element! 
Thanks for visiting and have a blessed day!


Friday, September 27, 2013

Wishing You A Sweet Christmas

It's time for a new challenge at Digitally Sweet Challenges.


Theme:
Anything Goes

Sponsor:

This sweet image is 'Eleanor and Pickles Peppermint Sticks' from Lacy Sunshine.  I've colored her with Prismacolor pencils and then added lots of Stickles and also added some dots with a pink glitter pen.  It's really a simple card with just some pom pom trim, a bow, and my bead center.

We look forward to seeing your creation for another Anything Goes challenge.  
Thanks for visiting and have a blessed day!

challenges
Hanna & Friends Challenge #181:  best friends
ABC Challenges:  V is for very cute
Country View Crafts:  layers
Designed To Color:  anything goes

Wednesday, September 25, 2013

Celebrate Love

Several weeks ago, I said I would share some of the projects I made for our son and fiance's engagement party. These are the invitations I made.


I used an ODBD 'Birds and Butterfly Labels' stamp and lots of die cuts.  Their wedding colors will be black and white; I added the blue for some color interest.  The sentiment was created and printed from my computer.

Thanks for visiting and have a blessed day!

challenges I would like to enter
Our Daily Bread Designs:  anything goes
Craft Your Passion:  no colored in image
4 Krafty Girls:  anything goes
Crafter's Cafe:  dies/ punches
Creative Craft Challenge:  #19 use ribbon
Party Time Tuesdays:  anything goes
Hiding in my Craftroom:  #116 Lots of Layers


Heartfelt Creations Semifinalists_Please Vote

I am so excited!  I have been accepted as a semifinalist for Heartfelt Creations Design Team!  I absolutely love their products, and having worked with them before, know that everyone within the company is so wonderful to work with!  I would really appreciate your vote (Sarah Miller, that's me)!  


Here is what you need to do
Vote for your favorite Semifinalists: We would love to have you particpate and vote your 5 favorite semi-finalists. Review each one of their blogs from here and then follow the instructions to submit your vote. When you vote, you will also be entered into a drawing to be eligible to win a $50 HC Gift Certificate. You can only vote one time and you have to select 5 or more to be eligible to participate. Voting ends on October 18th, 2013

Vote for your favorite Designers: When we announce a new design team call that also means that we have a tough time deciding which of the current designers continue on the HC design team. We are giving you the opportunity to get involved and vote for 5 or more of your current favorite design team members. You can CLICK HERE and submit your vote. When you vote, you will also be entered into a drawing to be eligible to win a $50 HC Gift Certificate. You can only vote one time and you have to select 5 or more to be eligible to participate. Voting ends on October 18th, 2013

Thank you for taking the time to vote for your favorite semifinalists, there's lots of awesome talent!
Have a blessed day!

Tuesday, September 24, 2013

Heartfelt Creations

Where, oh where, has my mind gone!?  I'd really like to have it back, LOL!  The problem is, I had no idea it was the end of the month already!   Where has the time gone!?  Today is the day for the Heartfelt Creations Alumni Team Blog Hop and I have had my card ready for 3 weeks but forgot to sign up!  If you would like to participate, head on over to Selma's blog and join the hop for the chance to win a $25 gift certificate.  She'll have the hop list for you. 


For my card, I used the new Christmas Sentiments Circles PreCut Set to create a shaker card.  I used the smaller image for the stopper.  The flowers are the Petite Poinsettia PreCut Set, cut out with the Layered Poinsettia Shapeabitlities die


Challenges I would like to enter
Craft Your Passion:  no colored in images
Make it Monday:  anything goes
613 Avenue Create:  anything goes or create your own color challenge
Challenges 4 Everybody:  anything goes
Creative Inspirations Paint:  anything goes
Crafty Hazelnut's Christmas Challenge:  use a stamp

Thanks for visiting and have a blessed day!

Monday, September 23, 2013

Sing A New Song

Oh sing to the Lord a new song; for He has done marvelous things!  Even though fall brings a close to another growing season; the gorgeous colors remind us that there are awesome things ahead!

I was so excited to receive my Gelatos in the mail today.  I had seen a technique where real leaves were used and wanted to try it.  I really thought I remembered how it was done and didn't bother checking until I was finished.  Turns out, the only thing I got right was using real leaves, LOL!

I wanted fall colors so I used green, yellow, orange and red.  I used 90# watercolor paper. After blending the colors, they were very vibrant so I dried the paper and then went over them with white.  I wet the leaves and then added the color directly to them.  I placed the leaves on the paper, covered them with a paper towel, and then ironed over them.  For this being my very first time using Gelatos, I was really happy with the final results.  I have lots more ideas floating around so we'll see what happens next.  Art is always an adventure!

Oh yes, I also purchased a new Scalloped Borders One die.  Shopping is so much fun!

challenges I would like to enter
Craft Your Passion:  no colored in images
Lexi's Creations:  autumn colors
The Paper Girls:  make your own stamps
Dream Valley Challenges:  autumn
A Creative Romance:  dies or punches
Chocolate, Coffee & Cards:  anything goes
Jo's Scrap Shack:  anything goes
Word Art Wednesday 98:  anything goes
Bloggers Challenge:  welcome fall

Thank you so much for visiting and have a blessed day!