Wednesday, April 24, 2019

Heartfelt Creations Inspiration Wednesday

Hello friends! Today we have another very special release from Heartfelt Creations. There is a new 8" x 8" Insta Album along with the most gorgeous dies.


I chose to focus on two of the dies, the Regal Frame & Accents Die and the Regal Pocket Accents Die, along with the Sweet Peony paper collection. Below you will find all the products I used with the instructions.

Heartfelt Creations products

HCD1-7248                       Regal Frame & Accents Die
HCD1-7247                       Regal Pocket Accents Die
HCDA1-449                        Stack and Store Daubers-Pack of 6

other products
Card stock, white; Color Box Pigment Ink Pad, Passion Pink; Anna Griffin Pigment Ink Pad, Crimson; Ranger Distress Ink, Dusty Concord; hot glue; 2 rhinestones

instructions
Card base: Cut a white piece of card stock 6” x 12”, fold in half with side fold. Cut a 6” square card panel to 5 7/8” square, add to card front. From white card stock, die cut the largest shape from the Regal Frame & Accents die. Die cut 2 of the larger frame, 1 without the center cut out and 1 with the center cut out from white card stock. Glue the 2 frames together. Using a bird design from the Peony Paper collection, cut out with the largest oval die. Insert in the frame. Die cut the Regal Pocket Accents die from white card stock. Adhere to the right side of the frame. Add entire piece to card front. Stamp all flowers and leaves on Deluxe Flower Shaping paper using
Dusty Concord for peony, Crimson for Cherry Blossoms and Bamboo Leaves for leaves. Using sponge daubers, ink peony and leaves with same ink. Ink cherry flowers with Passion Pink. Die cut with coordinating dies and then shape with coordinating 3D molds. Use the 3D Floral Basics Shaping Mold for the Peony. Finish shaping with the Flower Shaping Essentials tools. Add stamens to centers of flowers. Add the leaves to the card and then

make 2 groups of 3 of the wire stem stamens and add 1 group to the top and 1 group to the bottom of the leaves. Arrange flowers as shown with hot glue. Using the ‘Happy Mother’s Day’ stamp, mask off everything but the word ‘mother’ and stamp on white card stock with Jet Black. Die cut with the smaller frame. Remove the center with the word.  Die cut 2 more frames and glue the 3 frames together. Ink around the edges of the frame and the outside of the stamped piece with Passion Pink. Add the inside piece back into the frame and adhere to the left upper side of the card. Add rhinestones. 

Thanks so much for visiting and have a blessed day! 

Wednesday, April 17, 2019

Heartfelt Creations Inspiration Wednesday

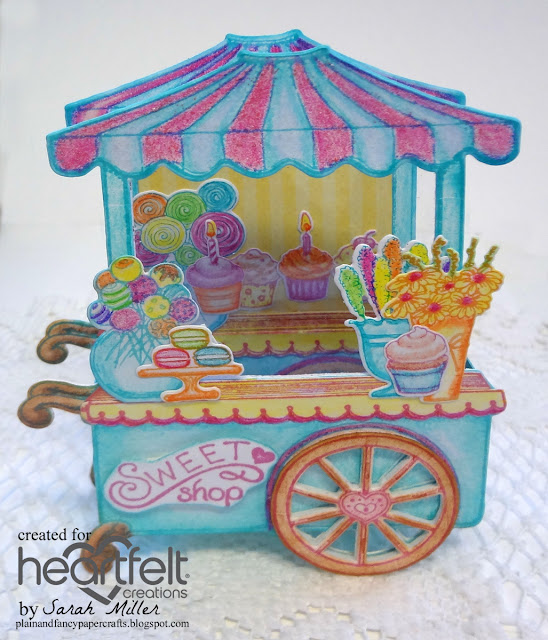
Hello friends! Today I'm sharing a cute treat box made with the Sugarspun Collection from Heartfelt Creations.


Heartfelt Creations products


other products
White card stock; Ranger Archival Ink Pad, Aquamarine; acetate;  Prismacolor pencils; Wink of Stella, clear; craft foam; foam tape; zip lock bag 

instructions
Stamp 2 cart images on white card stock with Aquamarine. Color with Prismacolor pencils. Add Wink of Stella over canopy. Die cut with coordinating die. Stamp only the shelf and scallop front twice with Magenta Hue and color yellow with pencils. Cut the shelf out by hand and the scallop border with the coordinating die. Adhere to the cart. Also die cut 2 more carts without stamping from white card stock. Stamp the wheel with Magenta Hue, color with pencils and cut with coordinating die. Also cut wheel from craft foam and adhere to back of wheel. Adhere to cart. Stamp ‘sweet shop’ on white card stock with Magenta Hue and ink the edges with Aquamarine, add to cart with foam tape. Cut a piece of acetate 2 1/2" square, adhere to back of cart window. Adhere plain white cart die cut to back of cart. To create the back piece, cut a piece of yellow design paper 2 1/2" square and add behind window of second colored image then adhere the plain white cart die cut over the back. Adhere the window back in place. To create the box, cut a piece of white card stock 2 1/2" x 6 1/8”. Color with Aquamarine. Score both 6 1/8” sides at 1/4". Score the short sides at 1 1/2", fold on score lines. On both long sides, cut up to the 1/4" score line on each 1 1/2" score line. Fold up into a 3 sided box and adhere to the front and back cart pieces, lining up the sides and bottom.

On white card stock, stamp all but the large cake stand and set of 3 cupcakes with Aquamarine, Magenta Hue, and Tangelo. Color with pencils and adhere to cart as shown. Place candy in small zip lock bag. Die cut ticket and add to bag. 

Thanks for visiting and have a blessed day!